Now that your familiar with setting up an automation framework, let’s go ahead and begin adding actions.
There are dozens of options to choose from, so let’s discuss them.
The first tab is your ‘sending options’ tab. Here you can choose to send an e-mail to you or the user. You can also send a text message (your limited to 120 characters). And finally you can set up a notification e-mail (i.e. let’s say your running Facebook lead gen ads, and someone fills out your form; members of your organization can be notified of the new submission).
You are not limited to adding these actions once – you are unlimited as to how many times an e-mail notifier can be set up.
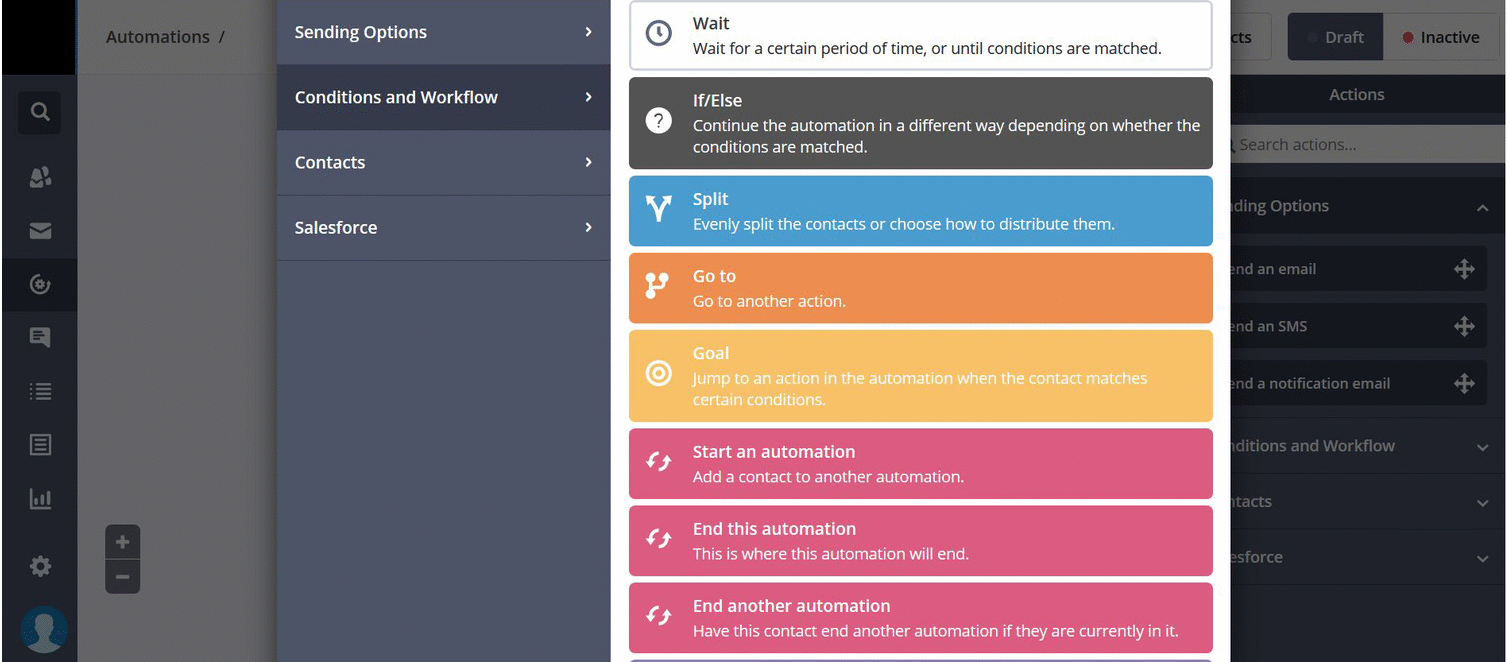
Under the ‘Conditions and Workflow’, you have the following options:
Wait – this wait step allows you to delay the next action in your sequence by minutes, hours, and days, weeks, months, or even years.
On the flipside, you can choose to Wait until certain conditions are met (i.e. user action or a specific date.
If/Else – this is easy to understand but tricky to set up. The If/Else statement tells the automation IF an action takes places, DO this. You would select a condition (AKA trigger) such as a customer detail, time/date, action, or geography and the automation takes the next logical step. For example, if a user opens an email, your IF action would be ‘open e-mail’, and your action is to send that contact down a different path so they don’t receive an additional e-mail.
Split – this is similar to an If/Then statement in terms of paths. You can tell the automation that the first 50 people go down a specific path, and the next 50 people go down a different path.
Go to – you probably won’t use this action. Ever. It’s designed to connect complex actions in an automation.
Goal – this is useful if new contacts have been added to your list, but didn’t make it into the automation (for whatever reason). The Go to action skips however many e-mails you’d like to come even with the other contacts. This is useful for a time-based (holiday) campaign.
Start/End Automation – You can (at any point) start another automation or end this automation for a contact. Whatever action they take will be recorded in the Recent Activities tab.
Under the Contacts tab, you have the following options:
Subscribe/Unsubscribe: You can automatically have a contact be assigned to a list, or become unassigned to a list. Be careful with this thought; a contact must be assigned to at least one list, otherwise they will become inactive.
Update a contact: This action allows you to update any one of the default or custom fields you have (i.e. adding a tag, updating a zip code, etc).
Add/remove a tag: If your contact places an order during a certain time period, you can assign that person a tag (i.e. LaborDayOrder2019). You can also have a tag removed during a sequence to keep track of their progress through an automation.
Add a note: Rather than searching for and clicking into individual contact cards to leave a note, you can have it done automatically using this option.
As for the last tab, Salesforce, unless you have an active account with them, this will be a useless integration for you. Contact your eBlastMail account manager for more information.
 Download this document in Word format